Making Your Own Bike Fenders
Author

Chris shares his passion for cycling, hiking, skiing, and climbing from Buxton, in the Peak District. As a blogger for Outdoor Look, Chris shares outdoor tips and indoor tricks to help you get the most out of your time spent outside. When he's not out adventuring he's making videos or trying to keep up with his 4-year-old son.
 What's better than enjoying a ride on your bike in spite of inclement weather conditions? Why should you put away your bike when there are ways to bike it down safely to your office? You can get going with your biking streak by adopting a few DIY methods for making fenders for your bike, and saving it from all the grit and grime. All you need is to be well equipped and have a little knowledge about tools like hacksaws, drills, etc.
Here's a list of items you will need for this new venture:
- A bag consisting of a hacksaw, clamp (1/16"), flat file, Allen wrench, needle-nose pliers, Screwdriver, Crescent wrench, Sandpaper (optional), marker, and drill with 5/32 and 7/32 drill bits
- Galvanized utility wire (10 ft), aluminum flat bars (48" × 1.5"), 5mm Allen head bolts, L angle bracket, flat washers, and 2" bolt
Follow few simple DIY steps to prepare sturdy fenders for your Bike. These are as follows:
Shaping
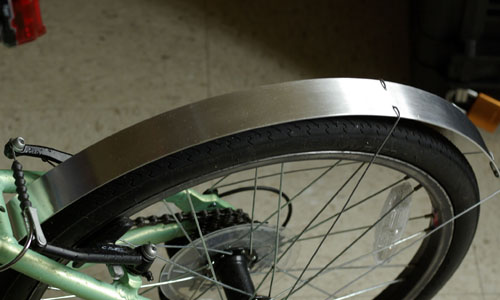
The shaping of the fender is a crucial step as you need to get it absolutely bang-on. One can use the rear wheel from the bike and throw aside the tire. Using the wheel is the best way to get the correct shape for your fender. Use the aluminum bar around the rim and get the desired curve by rubbing the metal over a stable surface. Do not leave any uneven angles or curves while rubbing. Repeat the same procedure for the second fender and fix the wheel back. If you do not have aluminum then you can use a cardstock with a lot of duct tape.
Rear fenders are usually half the circumference of the wheel, while the front one should cover about a quarter of the tire's circumference. This is where you can whip out the hacksaw. Use it to cut the marks that to achieve desired curves. Flat file can be used to smooth all the rough edges.
Attaching
A little marking needs to be done while your rear wheel is removed. Mark a spot on the rear fender around 1-2 inches from the bottom fender. The drilling ensues after this. Use a 7/32 bit to drill a hole. For all those micro-adjustments, drill an oval slot with the drill. The fender now needs to be mounted to the chainstay bracket with the help of a 5mm bolt and two washers. Adjust your fender according to the width of the chainstay.
Now mark the upper mounting hole and remove the fender from the frame and drill another hole. Slotting is to be followed again. Now you can finally mount the fender at both chainstay and seatstay and then replace the wheel, ensuring the fender is placed at the center and over it.
 Role of Wire Stay
All that is needed is to measure the required length of wire from one side to another. Leave out extra inches on either side for wrapping around dropout bolts. Now give the wire shape. Bend it to the shape of a U. Make sure the Wire Stay does not touch any component while you position the wire.
Mount cable clamps on each edge of the fender and drill holes on either side of the line with the help of the cable clamp mount. Drilling the holes with a 5/32 bit is what is required next. You can now easily mount the wire at the drilled holes. Mark three points 1 cm apart that provide you with a hint of where each bend will wrap the wire around the bolt. You can make the bends using pliers and then clip the excess wire.
Front Fender
Here is where the L Bracket will come into use. The L Bracket needs to be placed 6 inches from the front fender, and then two L bracket mounting holes need to be drilled using 7/32 bit. You can mount both L bracket and front fender to the fork crown and washers.
One needs to repeat the entire wire stay making process yet again.
The Ultimate Finish
Brighten up your fenders by applying some rough sandpaper to get away with the scuff marks or any kind of machine blemishes in the metal, and get ready to beat the weather with all of your waterproof rain gears and your super flexible bike. Polishing is another way to enhance the look of your highly functional and modified bike.
Author
Chris shares his passion for cycling, hiking, skiing, and climbing from Buxton, in the Peak District. As a blogger for Outdoor Look, Chris shares outdoor tips and indoor tricks to help you get the most out of your time spent outside. When he's not out adventuring he's making videos or trying to keep up with his 4-year-old son.
- Speed Up Your Post-Hike Recovery with These 6 Essential Tips
- Cycling through Tranquil Roads and Coastal Views on the Isle of Wight
- The Essential Guide to Hiking Safety: 5 Tips Every Hiker Should Know
- Run Smart, Run Strong: Your Guide to Injury-Free Running
- Embrace Biking: Essential Tips for Beginners
Categories
- Sport (28)
- Product Reviews (3)
- Team Outdoor Look (7)
- Mike Wild (2)
- Mike Payton (2)
- Suse Hammond-Pears (3)
- Snowboarding (12)
- Latest Offers (105)
- Shop Talk (1)
- Competitions (7)
- Walking (413)
- Lifestyle Fashion (8)
- Travel (86)
- Kit Guides (176)
- Workwear Clothing (6)
- Safety Workwear (4)
- Health/Fitness (289)
- Skiing (91)
- Great Outdoors (1316)
- Cycling (92)
- January 2025
- December 2024
- November 2024
- October 2024
- September 2024
- August 2024
- July 2024
- June 2024
- May 2024
- April 2024
- March 2024
- February 2024
- January 2024
- December 2023
- November 2023
- October 2023
- September 2023
- August 2023
- July 2023
- June 2023
- May 2023
- April 2023
- March 2023
- February 2023
- January 2023
- December 2022
- November 2022
- October 2022
- September 2022
- August 2022
- July 2022
- June 2022
- May 2022
- April 2022
- March 2022
- February 2022
- January 2022
- December 2021
- November 2021
- October 2021
- September 2021
- August 2021
- July 2021
- June 2021
- May 2021
- April 2021
- March 2021
- February 2021
- January 2021
- December 2020
- November 2020
- October 2020
- September 2020
- August 2020
- July 2020
- June 2020
- May 2020
- April 2020
- March 2020
- February 2020
- January 2020
- December 2019
- November 2019
- October 2019
- September 2019
- August 2019
- July 2019
- June 2019
- May 2019
- April 2019
- March 2019
- February 2019
- January 2019
- December 2018
- November 2018
- October 2018
- September 2018
- August 2018
- July 2018
- June 2018
- May 2018
- April 2018
- March 2018
- February 2018
- January 2018
- December 2017
- November 2017
- October 2017
- September 2017
- August 2017
- July 2017
- June 2017
- May 2017
- April 2017
- March 2017
- February 2017
- January 2017
- December 2016
- November 2016
- October 2016
- September 2016
- August 2016
- July 2016
- June 2016
- May 2016
- April 2016
- March 2016
- February 2016
- January 2016
- December 2015
- November 2015
- October 2015
- September 2015
- August 2015
- July 2015
- June 2015
- May 2015
- April 2015
- March 2015
- February 2015
- January 2015
- December 2014
- November 2014
- October 2014
- September 2014
- August 2014
- July 2014
- June 2014
- May 2014
- April 2014
- March 2014
- February 2014
- January 2014
- December 2013
- November 2013
- October 2013
- September 2013
- August 2013
- July 2013
- June 2013
- May 2013
- April 2013
- March 2013
- February 2013
- January 2013
- December 2012
- November 2012
- October 2012
- September 2012
- August 2012
- July 2012
- June 2012
- May 2012
- April 2012
- March 2012
- February 2012
- January 2012
- December 2011
- November 2011
- October 2011
- September 2011
- August 2011
- May 2010
- April 2010
- March 2010
- February 2010
- January 2010
- November 2009
- October 2009
- September 2009
Submit a Comment