Here’s How You Can Trim Your Skins With Ease!
Author
A keen runner, skier and nuts about cycling. Karl lives in Cumbria, where he loves encouraging his two children to follow in his outdoor lifestyle. Whilst out and about keeping active, Karl keeps a diary and shares it with Outdoor Look.
The skins are an important part of your skis. The term ‘skins’ has originated from the earliest climbing skins that were made using the hide of a fawn. These were the bristly hair of a young deer, which provided excellent grip traversing over long, flat distances.
There’s hasn’t been a significant degree of change as far as touring skins are concerned. The use of synthetic materials such as nylon has made these skins cheaper and far more durable than usual. Glues too, have become extremely durable and reliant.

Now, cutting and peeling skin might appear a daunting task at first. You certainly won’t start cutting them outright as you’ve spent a considerable amount of money to buy them. You can always ask an experienced ski enthusiast to do it for you, but if you are looking at a long and steady career with ski touring, you definitely need to do it yourself.
Which skin to buy?
There are different types of skins to choose from. Choosing to buy a skin would depend completely on your budget and the purpose you want it to serve. If you want a lightweight skin that is easily packable, choose a natural mohair (natural goat’s hair). Skins made of synthetic materials are ideal for undertaking short haul trips through steep terrains. The width of the skin holds a lot of importance, but with enormous shovels on fat skis, having the base of the ski covered in its entirety isn’t essential.
Now comes the blade
Now comes your blade. Each time you buy a new skin, you end up getting a new cutter as well. The best cutter to go about your job is the G3 Trimming Tool. Most ski shops would have a bucket full of these cutters. These cutting tools can come in handy and can save you a lot of effort. They are far more reliable than a regular razor blade tool. The beauty of a G3 Cutter is that it trims the perfect amount of skin to leave the required 2 mm of the edge exposed.
Here’s how to go about it
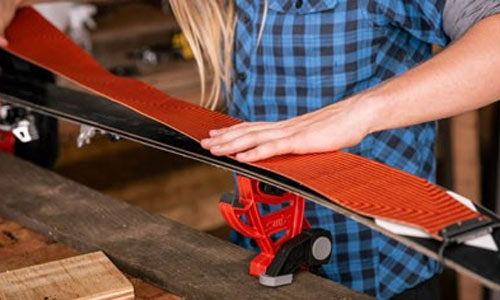
Once the backing film has been removed and the sticky side of the skin has been exposed, you can now carefully apply it to the ski. All you need to make sure is that it is centred along the longitudinal axis of the ski. This is, by far, the most important part of the entire process. Cutting skins before centring them will leave them lopsided. When they are ready to cut, the tool needs to be kept pressed against the side wall of the ski. Then, slowly drag it down the side of your ski. It is advisable not to do this exercise alone. It would be better if someone can hold the ski for you. You need to make one clean cut. Just don’t get impatient while undertaking this exercise as rushing might lead to burs and fraying of the skin. And finally, do not forget to use a sharp, new blade as using a blunt blade might leave your brand-new skin tatty. Additionally, any loose fibres from the cut can be burned using a matchstick or a lighter.
Now, wait for the snow to fall and enjoy the experience!
Author
A keen runner, skier and nuts about cycling. Karl lives in Cumbria, where he loves encouraging his two children to follow in his outdoor lifestyle. Whilst out and about keeping active, Karl keeps a diary and shares it with Outdoor Look.
Categories
- Sport (28)
- Product Reviews (3)
- Team Outdoor Look (7)
- Mike Wild (2)
- Mike Payton (2)
- Suse Hammond-Pears (3)
- Snowboarding (12)
- Latest Offers (105)
- Shop Talk (1)
- Competitions (7)
- Walking (413)
- Lifestyle Fashion (8)
- Travel (86)
- Kit Guides (176)
- Workwear Clothing (6)
- Safety Workwear (4)
- Health/Fitness (289)
- Skiing (91)
- Great Outdoors (1316)
- Cycling (92)
- January 2025
- December 2024
- November 2024
- October 2024
- September 2024
- August 2024
- July 2024
- June 2024
- May 2024
- April 2024
- March 2024
- February 2024
- January 2024
- December 2023
- November 2023
- October 2023
- September 2023
- August 2023
- July 2023
- June 2023
- May 2023
- April 2023
- March 2023
- February 2023
- January 2023
- December 2022
- November 2022
- October 2022
- September 2022
- August 2022
- July 2022
- June 2022
- May 2022
- April 2022
- March 2022
- February 2022
- January 2022
- December 2021
- November 2021
- October 2021
- September 2021
- August 2021
- July 2021
- June 2021
- May 2021
- April 2021
- March 2021
- February 2021
- January 2021
- December 2020
- November 2020
- October 2020
- September 2020
- August 2020
- July 2020
- June 2020
- May 2020
- April 2020
- March 2020
- February 2020
- January 2020
- December 2019
- November 2019
- October 2019
- September 2019
- August 2019
- July 2019
- June 2019
- May 2019
- April 2019
- March 2019
- February 2019
- January 2019
- December 2018
- November 2018
- October 2018
- September 2018
- August 2018
- July 2018
- June 2018
- May 2018
- April 2018
- March 2018
- February 2018
- January 2018
- December 2017
- November 2017
- October 2017
- September 2017
- August 2017
- July 2017
- June 2017
- May 2017
- April 2017
- March 2017
- February 2017
- January 2017
- December 2016
- November 2016
- October 2016
- September 2016
- August 2016
- July 2016
- June 2016
- May 2016
- April 2016
- March 2016
- February 2016
- January 2016
- December 2015
- November 2015
- October 2015
- September 2015
- August 2015
- July 2015
- June 2015
- May 2015
- April 2015
- March 2015
- February 2015
- January 2015
- December 2014
- November 2014
- October 2014
- September 2014
- August 2014
- July 2014
- June 2014
- May 2014
- April 2014
- March 2014
- February 2014
- January 2014
- December 2013
- November 2013
- October 2013
- September 2013
- August 2013
- July 2013
- June 2013
- May 2013
- April 2013
- March 2013
- February 2013
- January 2013
- December 2012
- November 2012
- October 2012
- September 2012
- August 2012
- July 2012
- June 2012
- May 2012
- April 2012
- March 2012
- February 2012
- January 2012
- December 2011
- November 2011
- October 2011
- September 2011
- August 2011
- May 2010
- April 2010
- March 2010
- February 2010
- January 2010
- November 2009
- October 2009
- September 2009
Submit a Comment